Integrate Snowflake Cortex Analyst REST API with Slack

UPDATE: As of 03/27/2025, Semantic Model Routing is Generally Available. This means you can provide multiple semantic models and the user requests will be routed across those semantic models automatically! The code/repo referenced in this blog has been modified to reflect this update.
UPDATE: As of 02/12/2025, Cortex Analyst is Generally Available.
Overview
Cortex Analyst is a fully-managed, LLM-powered Snowflake Cortex feature that helps you create applications capable of reliably answering business questions asked in natural language. It is available as a convenient REST API so you can seamlessly integrate it into any application.
In this blog, we will see how to integrate the Cortex Analyst REST API with Slack.
Why Cortex Analyst?
Business users have typically relied on BI dashboards and reports for data insights, but these tools often lack flexibility, requiring users to wait on busy data analysts for updates. Cortex Analyst addresses this with a natural language interface that offers high text-to-SQL accuracy, allowing organizations to develop conversational applications. This enables business users to query data in natural language and get accurate answers in near real time. Learn more about Cortex Analyst.
Why Slack?
Slack is a communication and collaboration platform designed to streamline workplace interactions. It allows teams to organize conversations by channels, send direct messages, share files, and integrate with other tools for a seamless workflow. Slack also supports the deployment of bots and apps, making it a hub for productivity, quick information sharing, and team alignment across projects.
Demo

Let’s get started!
Prerequisites
- A Snowflake account in one of these regions. If you do not have one you can register for a free trial account.
- A Slack account with access to a workspace where you can install applications. NOTE: Slack recommends using a workspace where you won’t disrupt real work getting done — you can create a new one for free.
Step 1: Setup Slack
Follow instructions in this step-by-step guide to create and set up your barebones Slack application in Python. Note: You may skip the section titled “Sending and responding to actions” since we won’t be using that in our application.
Before proceeding, please make sure you have the boilerplate Slack application running as shown in the above guide.
@app.message("hello")
def message_hello(message, say):
  # say() sends a message to the channel where the event was triggered
  say(f"Hey there <@{message['user']}>!")

# Start your app
if __name__ == "__main__":
  SocketModeHandler(app, os.environ["SLACK_APP_TOKEN"]).start()
Step 2: Setup Snowflake
- Run the following statements in a SQL worksheet to create SUPPORT_TICKETS and SUPPLY_CHAIN tables and load data from AWS S3.
use <your-db-name>.<your-schema-name>;

-- SUPPORT_TICKETS
create or replace file format csvformat
  skip_header = 1
  field_optionally_enclosed_by = '"'
  type = 'CSV';

create or replace stage support_tickets_data_stage
  file_format = csvformat
  url = 's3://sfquickstarts/sfguide_integrate_snowflake_cortex_agents_with_microsoft_teams/support/';

create or replace table SUPPORT_TICKETS (
  ticket_id VARCHAR(60),
  customer_name VARCHAR(60),
  customer_email VARCHAR(60),
  service_type VARCHAR(60),
  request VARCHAR,
  contact_preference VARCHAR(60)
);

copy into SUPPORT_TICKETS
  from @support_tickets_data_stage;

-- SUPPLY_CHAIN
create or replace stage supply_chain_data_stage
  file_format = csvformat
  url = 's3://sfquickstarts/sfguide_integrate_snowflake_cortex_agents_with_microsoft_teams/supply_chain/';

create or replace TABLE SUPPLY_CHAIN (
 PRODUCT_ID VARCHAR(16777216),
 SUPPLIER_VENDOR_NAME VARCHAR(16777216),
 INVOICE_NUMBER VARCHAR(16777216),
 PRODUCT_NAME VARCHAR(16777216),
 ORDER_DATE DATE,
 SHIP_DATE DATE,
 DELIVERY_DATE DATE,
 DELIVERY_TIME NUMBER(38,0),
 PRICE NUMBER(38,2),
 AVERAGE_SHIPPING_TIME NUMBER(38,1),
 AVERAGE_PRODUCT_PRICE NUMBER(38,2),
 CAPACITY NUMBER(38,0),
 PAYMENT_TERMS VARCHAR(16777216),
 RETURN_RATE NUMBER(38,2),
 SHIPPING_START_LOCATION VARCHAR(16777216)
);

copy into SUPPLY_CHAIN
from @supply_chain_data_stage;- Run the following statement to create a Snowflake managed internal stage to store the semantic model specification file.
create or replace stage SEMANTIC_MODELS encryption = (TYPE = 'SNOWFLAKE_SSE') directory = ( ENABLE = true );Step 3: Setup Application
- Clone the GitHub repo.
- Use Snowsight to upload the Supply Chain and Support Tickets semantic model spec files to the SEMANTIC_MODELS stage.
- Configure key-pair authentication and assign the public key to your user in Snowflake and store/save/copy the private key file (.p8) in the cloned folder.
- Change or browse to the cloned repo folder sfguide-snowflake-cortex-analyst-slack-app on your local machine and open the contents of the folder in your favorite IDE — like VS Code.
- In the same folder, create a new file .env and set the following environment variables:
# Set environment variables
USER='your-snowflake-username'
ACCOUNT='your-snowflake-account-name'
RSA_PRIVATE_KEY_PATH='your-rsa-key-filename.p8'
SUPPORT_TICKETS_SEMANTIC_MODEL='@your-db-name.your-schema-name.semantic_models/support_tickets_semantic_model.yaml'
SUPPLY_CHAIN_SEMANTIC_MODEL='@your-db-name.your-schema-name.semantic_models/supply_chain_semantic_model.yaml'
ANALYST_ENDPOINT='https://your-account-name.snowflakecomputing.com/api/v2/cortex/analyst/message'
SLACK_APP_TOKEN='your-slack-app-token'
SLACK_BOT_TOKEN='your-slack-bot-token'Note: For help with setting the account name, refer to the documentation.
- In a terminal window, browse to the same cloned folder sfguide-snowflake-cortex-analyst-slack-app and run the following commands to install the Python packages and dependencies required for the application.
python3 -m venv .venv
source .venv/bin/activate
pip install -r requirements.txt
Step 5: Run Application
Now you can start the application by running the following command in a terminal window. (NOTE: Make sure you’re in the cloned repo folder sfguide-snowflake-cortex-analyst-slack-app where you executed the commands in the previous section.)
./slack_bot
If all goes well, you should see the following output…
⚡️ Bolt app is running!
Common Errors
When you run the application as instructed, you may run into some of these common issues.
Error: snowflake.connector.errors.DatabaseError: 250001 (08001): Failed to connect to DB: xxxxxx.snowflakecomputing.com:443. Incorrect username or password was specified.
If you get this error, make sure USER and PASSWORD env variables in the .env file are set correctly.
Error: snowflake.connector.errors.InterfaceError: 250003 (08001): 404 Not Found: post https://xxxxx.snowflakecomputing.com:443/session/v1/login-request?request_id=b4e367d4-d8ac-48d3-8e44-96f42defa9c5&request_guid=4f63e07c-e42c-43b8-8f79-f6c577ee0d0e
If you get this error, make sure the ACCOUNT env variable in the .env file is set correctly. (NOTE: For help with setting the account name, refer to the documentation.)
Slack it to me!
Assuming your app is running without any errors, head over to your Slack channel/app you set up in the Setup Slack section above. Then type the following questions:
Support Tickets
Can you show me a breakdown of customer support tickets by service type — cellular vs business internet?
In just a few seconds, you should see the following response:

Now let’s ask this question:
How many unique customers have raised a support ticket with a ‘Cellular’ service type and have ‘Email’ as their contact preference?
In a few seconds, you should see the following response:
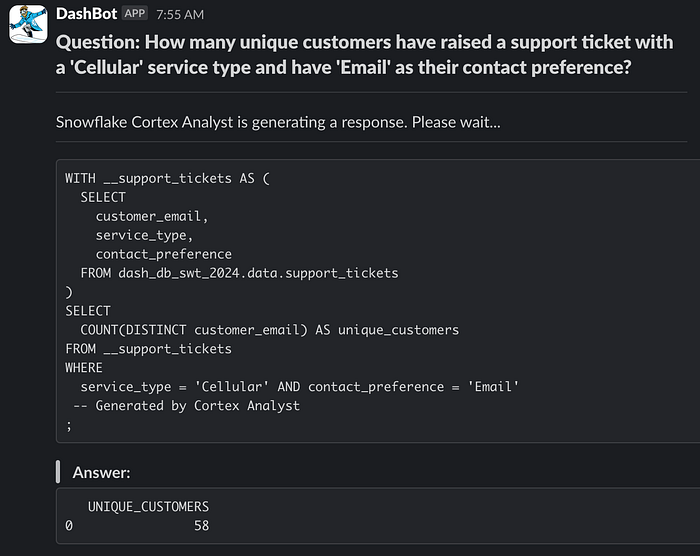
As you can see, now (business) users can directly get answers to their questions written in natural language using the Slack app.
Supply Chain
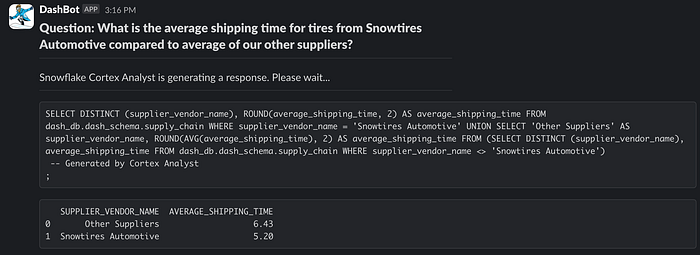
Now let’s ask questions that pertain to supply chain data.
What is the average shipping time for tires from Snowtires Automotive compared to average of our other suppliers?
In a few seconds, you should see the following response:
Code Walkthrough
Here are some things you should make a note of in case you’d like to extend or modify the application.
First, a secure connection to Snowflake is established and an instance of CortexChat is created in app.py file.
cortex_chat.py
CortexChat constructor takes ACCOUNT, USER, RSA_PRIVATE_KEY_PATH, ANALYST_ENDPOINT, SUPPORT_TICKETS_SEMANTIC_MODEL, and SUPPLY_CHAIN_SEMANTIC_MODEL as parameters.
generate_jwt()
It takes ACCOUNT, USER, and RSA_PRIVATE_KEY_PATH to generate a Java Web Token (JWT) for authorizing Cortex Analyst REST API.
query_cortex_analyst()
This method is called from process_analyst_message() in app.py. It calls Cortex Analyst REST API endpoint passing in the semantic model files, natural language prompt/question entered via Slack, and JWT as authorization bearer token. If the response (i.e. HTTP) code == 401, then the JWT is regenerated and a new Cortex Analyst request is invoked. If the response (i.e. HTTP) code == 200, then the flow continues and the response in JSON format os returned. Otherwise, an exception is raised.
app.py
process_analyst_message()
This method is invoked when you type a message/question in Slack. It first prints the question in Slack by calling say_question() and then invokes CortexChat.query_cortex_analyst() to call the Cortex Analyst REST API — which converts the message/question written in natural language into an executable SQL. Then, it calls display_analyst_content().
display_analyst_content()
This method is called from process_analyst_message. It takes the response from query_cortex_analyst() and sends the formatted output to Slack. Note that the response from Cortex Analyst REST API includes the SQL query that is generated based on the natural language prompt/question passed in as input. This SQL query is executed in the application (line 80 in app.py) to display the results in Slack.
plot_chart()
This method takes a Pandas DataFrame as an input and dynamically generates a pie chart. While disabled by default, if you’d like to see it in action, stop the application, set ENABLE_CHARTS = True (line 27 in app.py) and rerun the application.
Once enabled, try asking the same question in Slack:
Can you show me a breakdown of customer support tickets by service type — cellular vs business internet?
Within a few seconds, you should see this updated response with a chart:
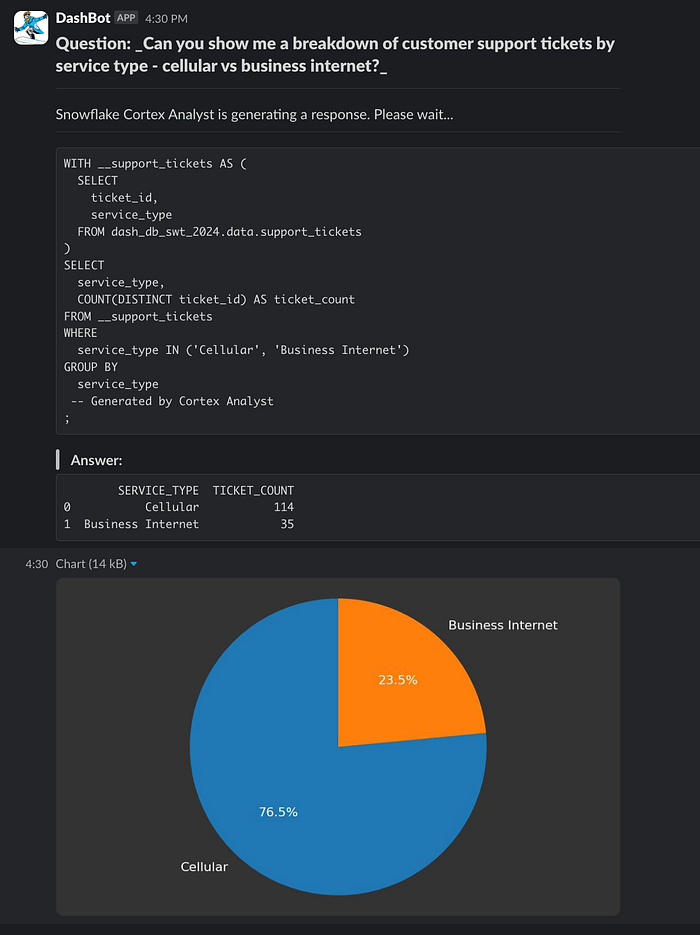
NOTE: While the code to generate the chart is very specific to the data used in this example, the flow/logic is broadly applicable.
- A chart is generated based on the data
- The chart image is saved locally — line 102 in app.py
- The image file is securely uploaded to Slack using Slack APIs (https://api.slack.com/methods/files.getUploadURLExternal and https://api.slack.com/methods/files.completeUploadExternal)
- The permalink provided by Slack is used to access / display the image — lines 103–109 in app.py
Conclusion
Thank you for your time. I hope you found this blog both educational and inspiring. Please feel free to connect with me on LinkedIn and Bluesky, where I share demo videos, code snippets, QuickStart Guides, and technical blogs. Don’t forget to also check out developer-focused solutions on Snowflake Solutions Center. I can’t wait to see what you build!
Related Resources
- GitHub repo
- Cortex Analyst REST API
- Cortex Analyst semantic model specification
- Semantic model generator
- Best practices for creating a semantic model
- Integrate with Cortex Search
- Cortex Analyst Verified Query Repository
UPDATE: As of 03/27/2025, Semantic Model Routing is Generally Available. This means you can provide multiple semantic models and the requests will be routed across those semantic models — automatically! The code in this blog has been updated accordingly.
UPDATE: As of 02/12/2025, Cortex Analyst is Generally Available.

